This is a collection of resources for the CRC team to utilize for creating, updating and maintaining the Grants Guide. If you would like something added to this list, please reach out to the Ligature Team.
- Adding Backend Users
- Adding Funders as users
- Adding Subscribers manually
- Using Coupons for Additional Users/Participants (coming)
- Resetting passwords
- Editing an expiration date
- Adding IP Addresses for Remote Proxy Users
Check out these instructions for managing the Funder-submitted Profile Creation and Edit Process.
Adding Backend Users (CRC Staff and Volunteers)
NOTE: all users must have a Membership added to their account in order to view the pages on the frontend —Funder/Grant profiles, Funder/Grant listings, dashboard + Save/Alert/Notes functionality.
- Click on USERS on the WP Admin
- Click ADD NEW
- Enter a USERNAME and EMAIL for the user. You can complete other fields (FIRST NAME, etc.) if desired, but they are not required.
- Make the SEND USER NOTIFICATION box is checked. This will send an email to the user with a link to sign in and update their password.
- Select the appropriate user ROLE
- Administrator — full access to the backend of the website, can create/publish/edit all post types, can create/edit users, access to Ecommerce, Options and other Settings.
- Volunteer — restricted access to the backend, can edit all post types, cannot publish new pages/posts but can submit for approval by an Admin, cannot access other user accounts, cannot access Ecommerce, Options and other Settings.
- Click ADD NEW USER
- Once the USER is saved, scroll to the bottom of their user profile to MEMBERSHIPS.
- Click ADD MEMBERSHIP
- On the Membership page, select VOLUNTEER MEMBERSHIP
- This is the same for any staff and/or volunteer membership. There is no set expiration date so you do not have to revisit this at any point.
- Click SAVE
Adding Funders
NOTE: all users must have a Membership added to their account in order to view the pages on the frontend —Funder/Grant profiles, Funder/Grant listings, dashboard + Save/Alert/Notes functionality.
- Click on USERS on the WP Admin
- Click ADD NEW
- Enter a USERNAME and EMAIL for the user. You can complete other fields (FIRST NAME, etc.) if desired, but they are not required.
- Make the SEND USER NOTIFICATION box is checked. This will send an email to the user with a link to sign in and update their password.
- In the ROLE dropdown, select FUNDER MEMBER.
- Click ADD NEW USER
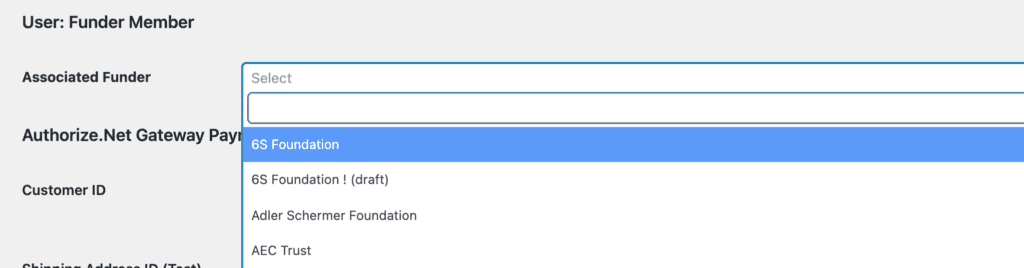
- Once the USER is saved, find the user in the listing and click EDIT
- Scroll to the Associated Funder field (about halfway down) and select the Funder Profile that this user is associated with.
- Scroll to the bottom of their user profile to MEMBERSHIPS.
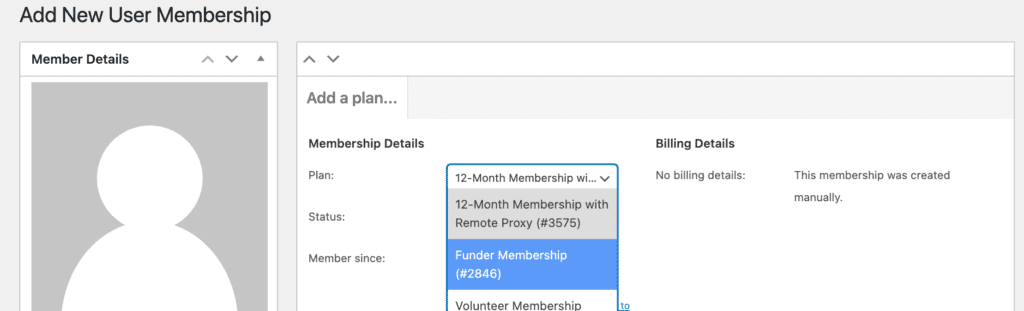
- Click ADD A MEMBERSHIP MANUALLY
- On the Membership page, select FUNDER MEMBERSHIP
- Click SAVE

Adding Subscribers manually
Most subscribers will be added to the system automatically when they purchase or renew their subscription. However, this is how to add a Subscriber manually should you want to add someone outside of the purchasing process.
- Go to WooCommerce > Memberships on the backend
- Click ADD MEMBER
- Select “Create new user to add as a member” from the dropdown
- Complete the fields
- Username is required
- Email is required
- Password is not required, but you can set an initial default password.
- The user will receive an email notification that their account has been created with a link to the Log In page where they can reset or adjust their password as needed.
- First / Last Name are optional
- Click SAVE
- On the Membership screen, select the appropriate Membership Plan.
- 3-Month Membership
- 12-Month Membership
- 12-Month Membership with Remote Proxy
- If you would like to adjust the Expiration Date, you can do so here.
- Click SAVE
Resetting Passwords
Subscribers can/should be able to reset their passwords on their own through the “Lost Your Password?” link on the Log In page. However, this is how a CRC team member (a site Administrator) is able to reset the password manually should a subscriber need assistance.
- Click on USERS on the WP Admin
- Search for desired user in the SEARCH field at the top right of the Users listing
- To send them a link to reset the password on their own:
- Hover over the User and click “Send password reset”
- The user will receive an automated email with a link to do so
- To reset their password to a specific one:
- Click the Username or EDIT
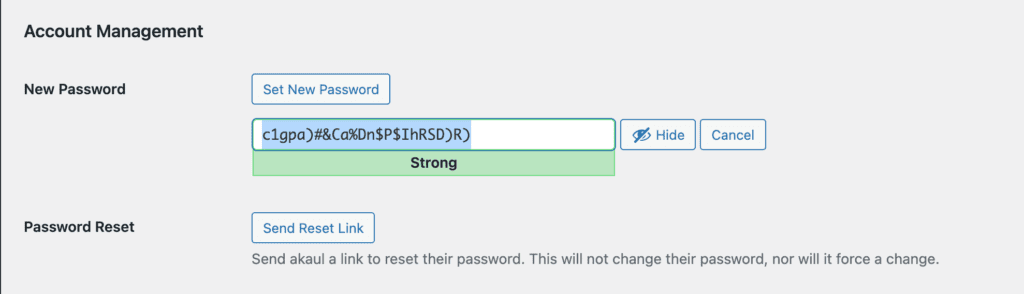
- Go to NEW PASSWORD
- Click SET A NEW PASSWORD
- Enter the preferred Password
- Click UPDATE USER

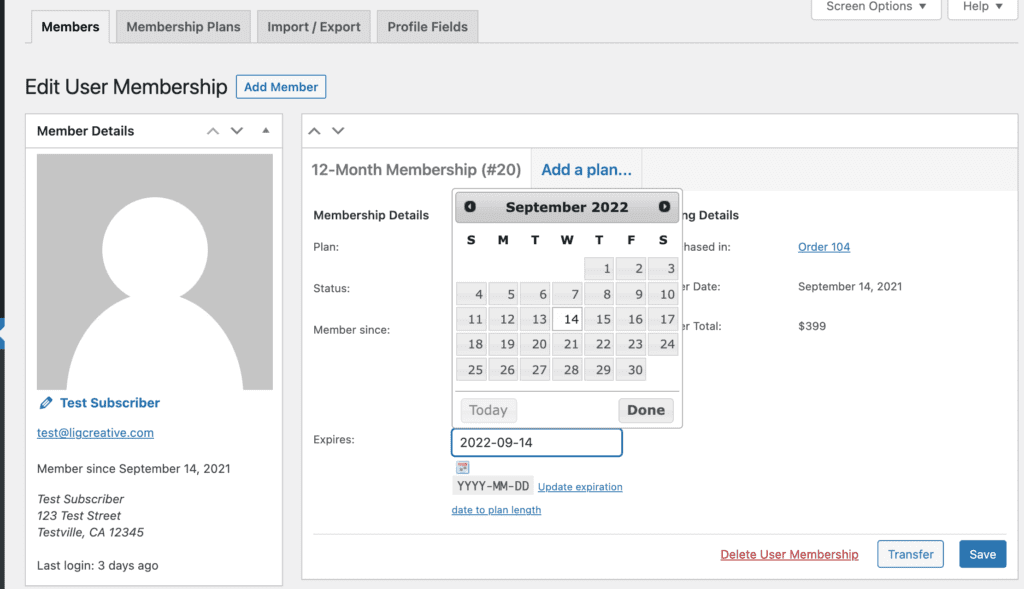
Editing Subscription Expiration Dates
Admin users are able to easily edit the subscription expiration date for any user on the site.
- Go to WooCommerce > Memberships on the backend
- Make sure you’re on the MEMBERS tab
- Search for the desired Member (subscriber) in the top right of the listing.
- Click the Username or EDIT right underneath it
- Click in the EXPIRES field to enter a date manually
- OR click the calendar icon right under the field to select from the Date Picker
- Click SAVE
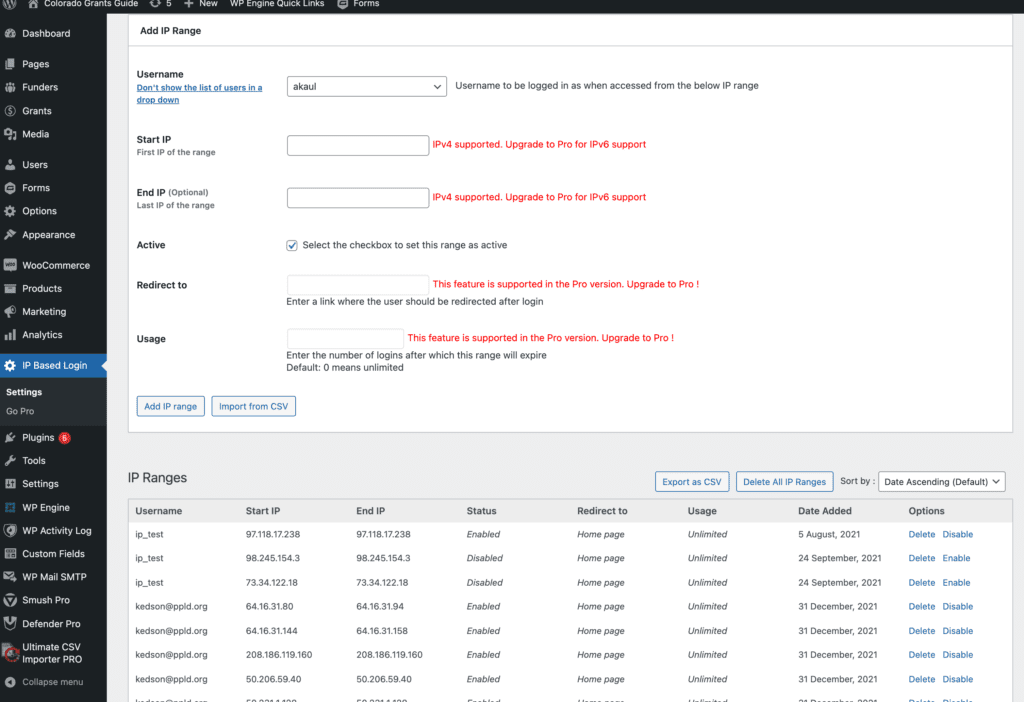
Adding IP Addresses for Remote Proxy Users
NOTE: all users must have a Membership added to their account in order to view the pages on the frontend —Funder/Grant profiles, Funder/Grant listings, dashboard + Save/Alert/Notes functionality.
- Click on IP BASED LOGIN on the WP Admin
- Enter the USERNAME of the subscriber you want to assign Remote Proxy access to.
- Note the line of instruction under this field name. You can either use a dropdown field to select the Username from a full list of users OR you can manually enter the Username if you don’t want to utilize the full list.
- Enter the IP Address in the START IP field
- If you have a range of IP Addresses to add, enter the last IP Address of the range in the END IP field.
- If you just have a single IP Address or a list of non-sequential addresses, you will just enter the START IP.
- Check the ACTIVE checkbox to make the IP Address immediately active for remote proxy access.
- Click ADD IP RANGE to save
- Repeat this as many times as needed to complete the list of IP Addresses provided by the Subscriber
Managing IP Addresses one entered:
- Click the DELETE or DISABLE links next to each IP Address as needed
- You can sort the list by DATE ADDED or USERNAME
- You can export the full list to organize as needed
WooCommerce Subscription Updates
What changed?
WooCommerce Subscriptions was added to the existing WooCommerce Memberships structure and configured to enable auto-renewal functionality. You’ll now see both ‘Subscriptions’ and ‘Memberships’ in the WooCommerce dropdown. CGG subscribers now need to have a subscription to a membership (i.e. a subscriber will have an annual subscription to the 12-Month Membership).
Troubleshooting Subscriber Access
You’ll see a user’s membership (i.e. 12-Month with Remote Proxy) under their user profile. This section will also tell you if the user’s membership is active or inactive.
You’ll need to look under ‘Subscriptions’ to determine whether the user has a subscription to their membership. From the ‘Subscriptions’ tab, you’ll be able to see the subscription number, the user’s name, the membership they’re subscribed to, and the order affiliated with that subscription.
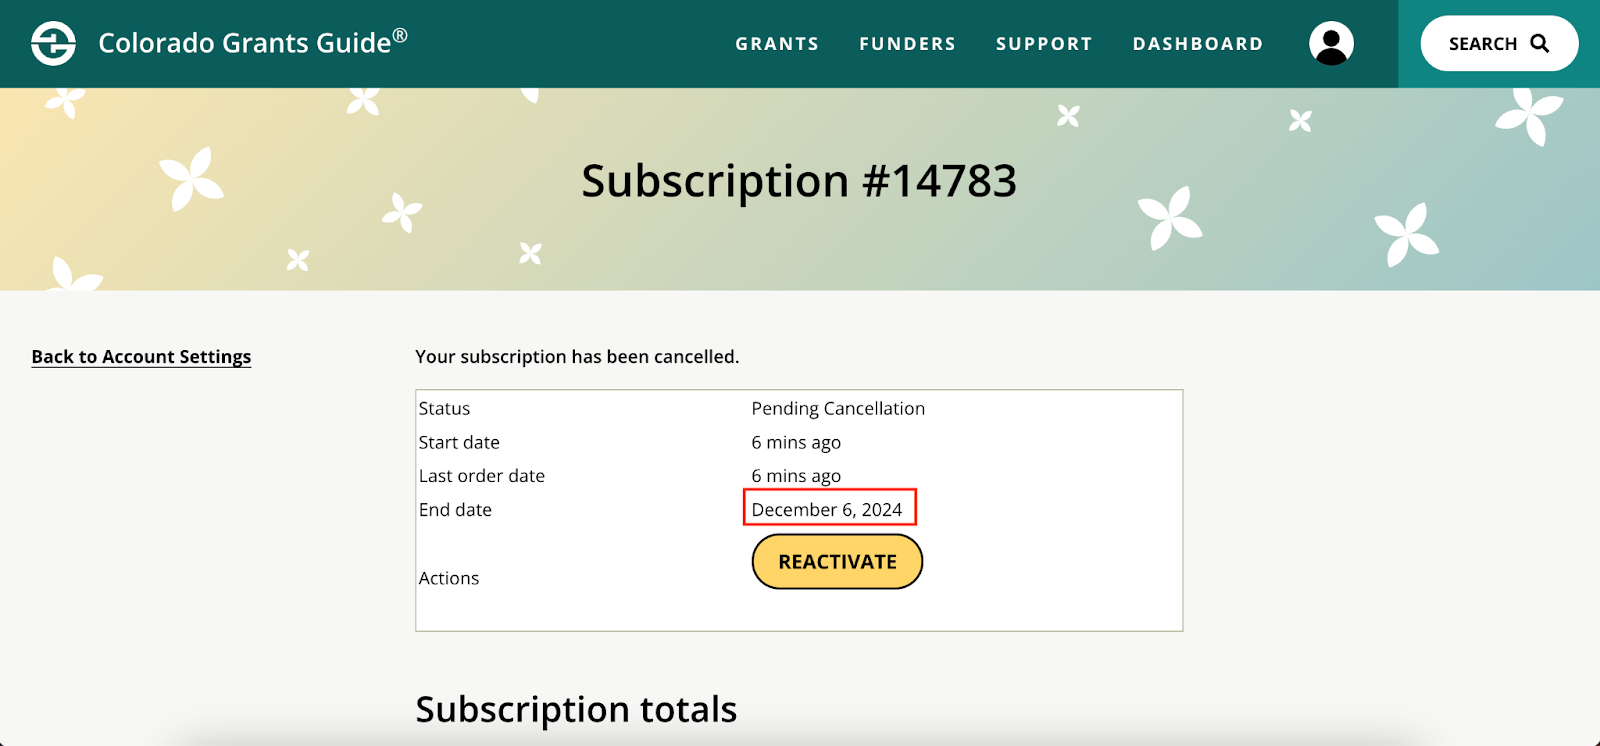
Subscriber Cancelation Path
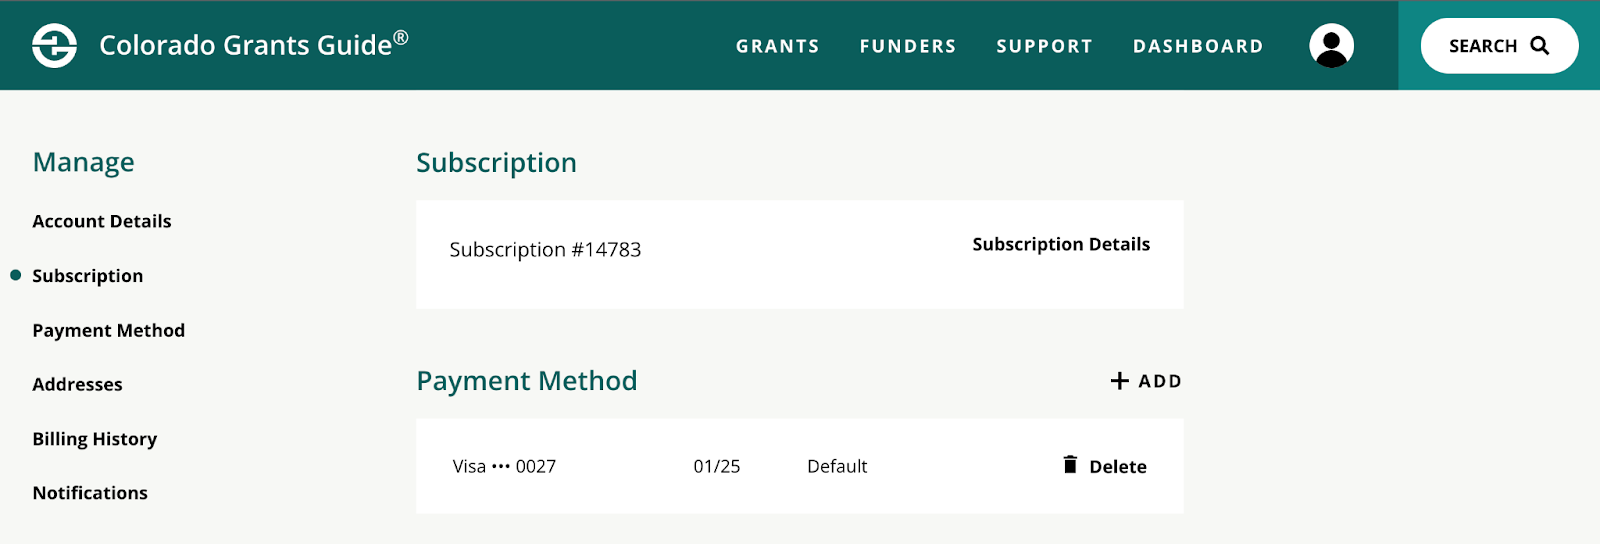
As a subscriber, you can cancel your subscription from the Account Settings tab in your Colorado Grants Guide dashboard.
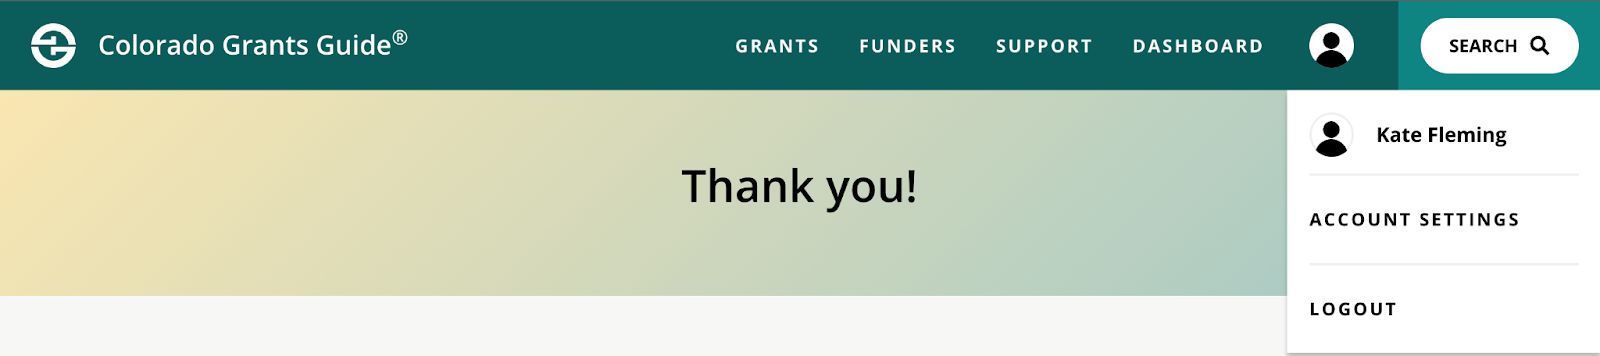
Navigate to the Subscription section of the Account Settings page. From there you’ll see the Subscription # and Subscription Details. Click Subscription Details.
From the Subscription Details screen, you’ll be able to Cancel your subscription or Change Payment method.
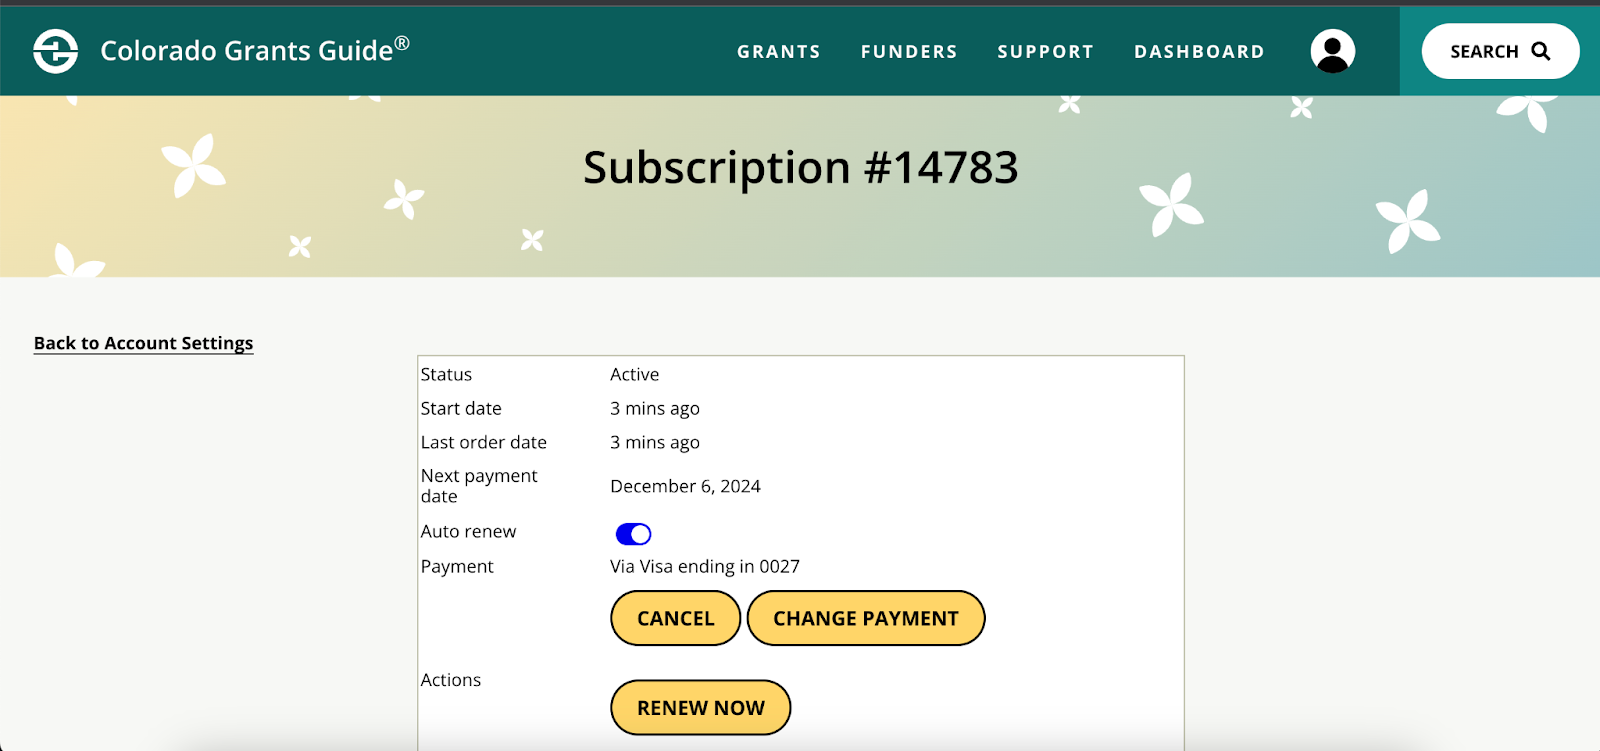
Click Cancel to cancel your subscription. You will see a notification that your subscription has been canceled.
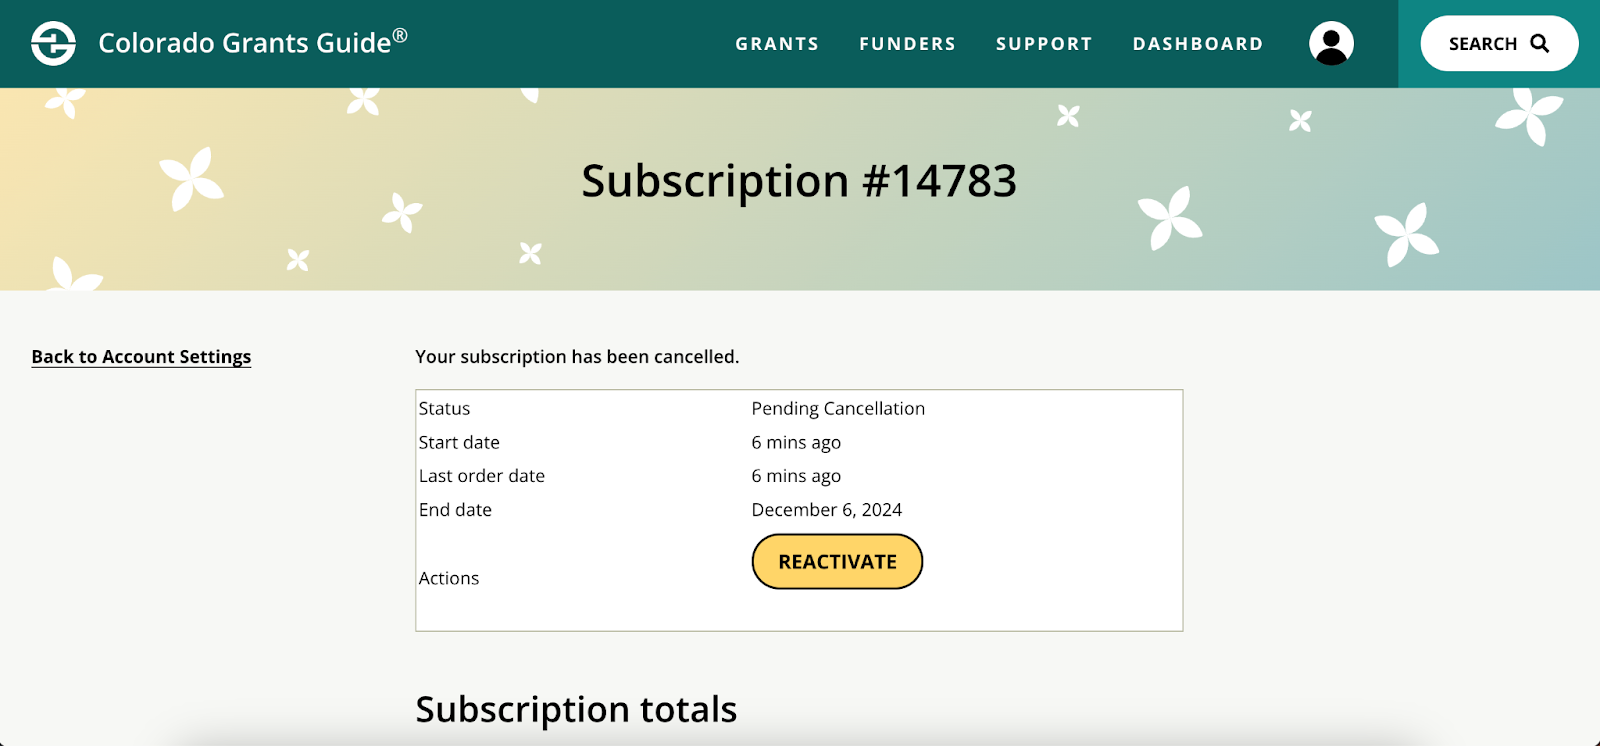
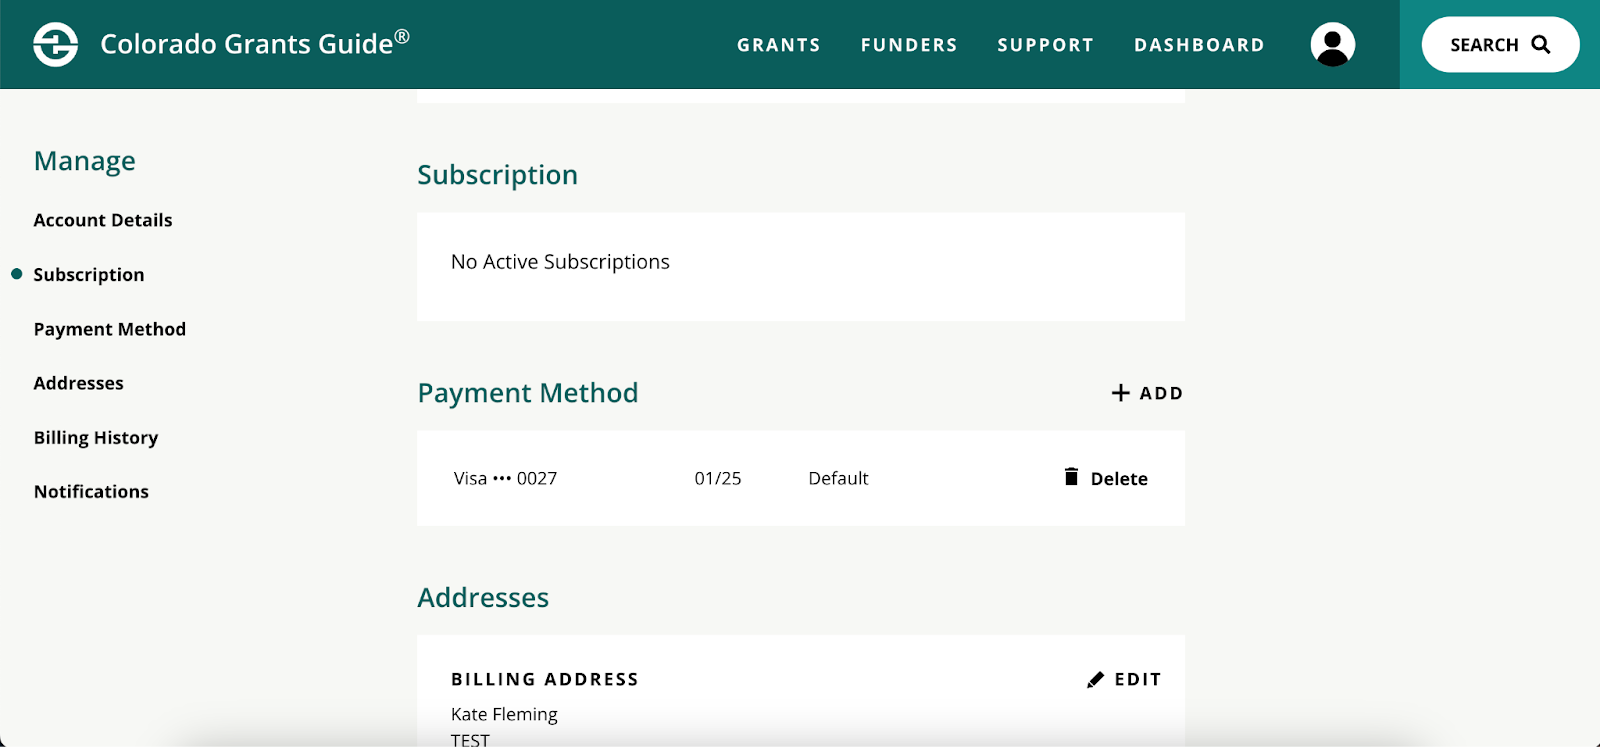
You will also see that you have no active subscriptions under the Subscription section of your My Account dashboard.
You will still be able to access the Colorado Grants Guide until your subscription End Date.